Building a Lightweight Inventory Check App with ProGlove, MQTT, and n8n (Part 2)
In our previous article, we explored how ProGlove devices can communicate via MQTT and how to route that data into n8n workflows.
Now, we’re taking the next step: turning that integration into a small, fully functional inventory check app - complete with user feedback on the MAI and data persistence via Google Sheets.
1. User Flow and MAI Interaction
Before diving into the technical setup, let’s look at the user flow and MAI interaction we’re building toward:
- The worker scans an article barcode with their ProGlove MAI.
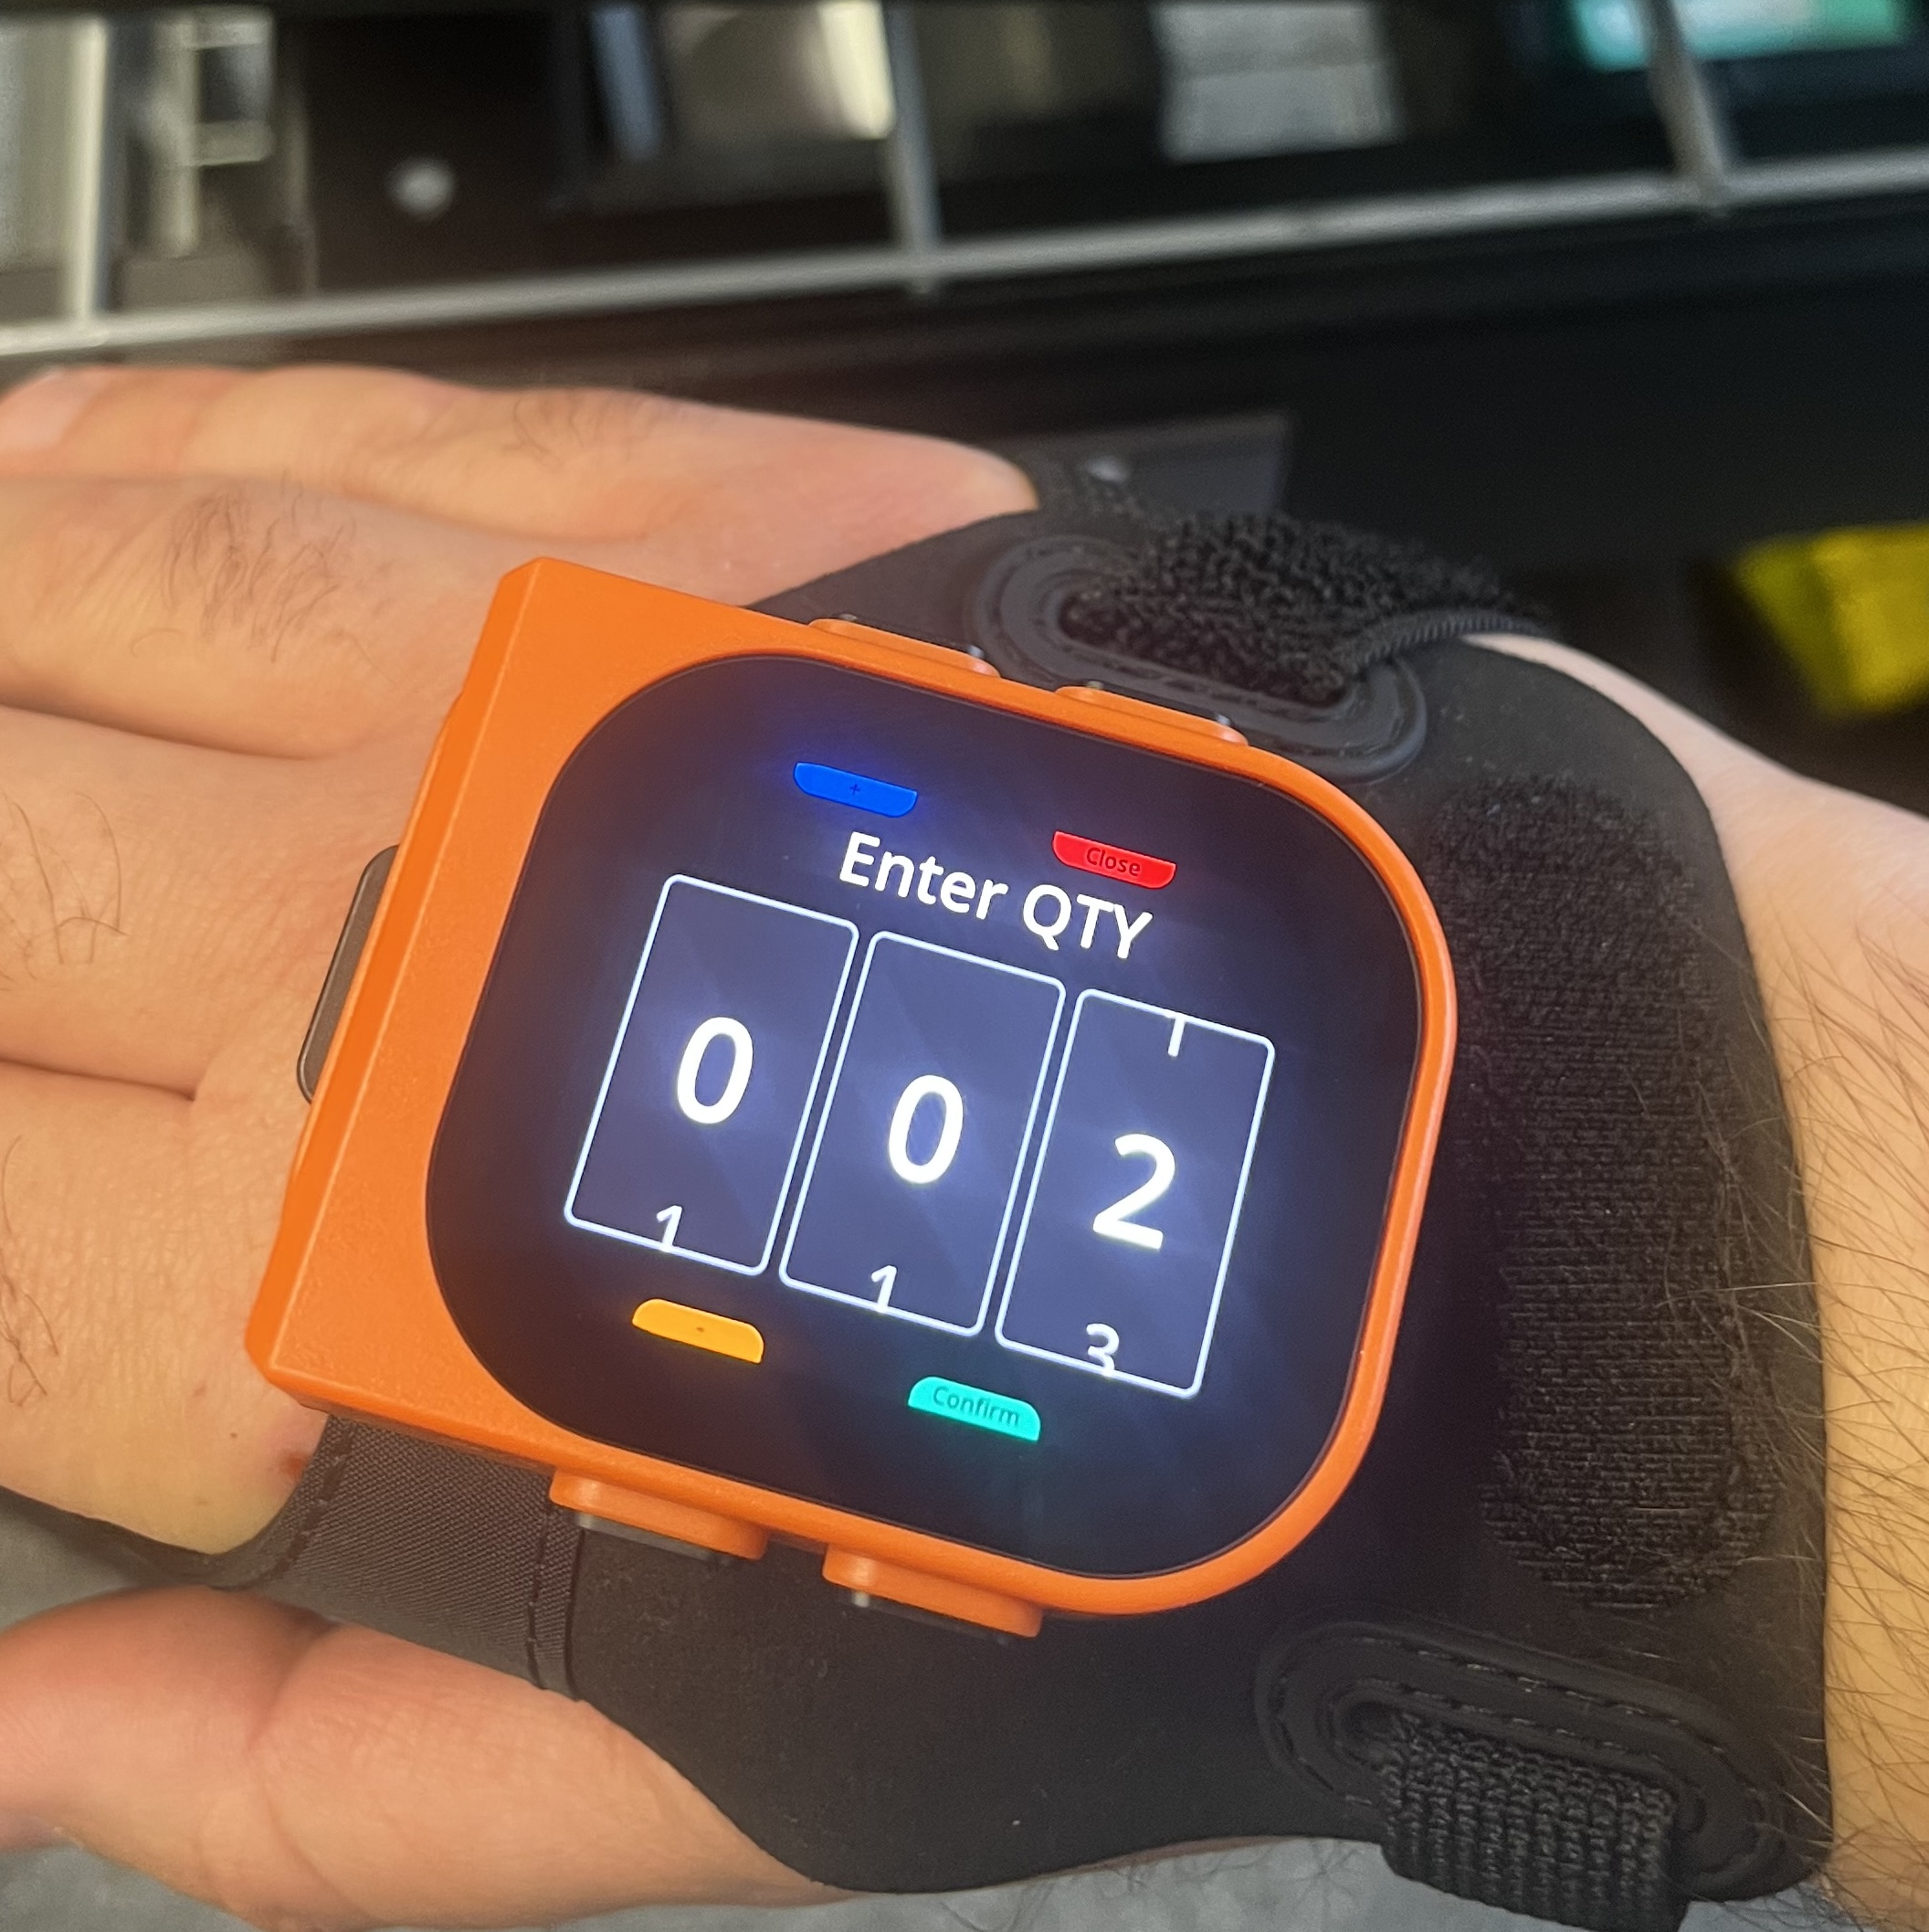
- The MAI displays a Work3 T3 screen, showing key information: product code, expected quantity, and storage location - this is our Choose Item Flow.

- The worker can use the num wheel input to edit the quantity or use on-screen buttons to confirm or mark as unavailable.
- Once an action is taken, the device sends an MQTT update that triggers the Confirm Quantity Flow in n8n.
- The MAI then provides immediate visual and haptic feedback and transitions to a Notification T1 screen, guiding the worker to the next item.
The MAI screens are chosen to mirror the simplicity and legibility emphasized in ProGlove’s UX guidelines. The Work3 layout provides structured data entry with two action buttons, while the T1 notification keeps follow-up messages short and unambiguous. Together, they create a natural, glanceable workflow that requires minimal cognitive effort.
This creates a closed feedback loop between worker, device, and system - every scan, input, and response travels through MQTT, while n8n orchestrates the logic and updates the shared Google Sheet.
2. Google Sheets as a Lightweight Backend
To keep things simple, this demo uses a Google Sheet as a mock backend. It acts as a basic database that stores product IDs, locations, expected and confirmed quantities, and timestamps.
In a production environment, this would typically be replaced by an API endpoint or a connection to a warehouse management system (WMS). For prototyping, though, the Sheet offers transparency, easy sharing, and instant visual feedback when rows are updated.
| Product | Sequence | Storage Location | Quantity_expect | Quantity_Present | Date |
|---|---|---|---|---|---|
| 4018877699 | 1 | P-1001 | 2 | 2 | 2025-10-16T10:45:50 |
| 4003530160 | 2 | P-0001 | 1 | 3 | 2025-10-16T10:46:16 |
| 4001686519 | 3 | P-2004 | 5 | 15 | 2025-10-16T10:46:38 |
This backend connects directly to the n8n workflow, where each update from the MAI triggers changes to the sheet in real time.
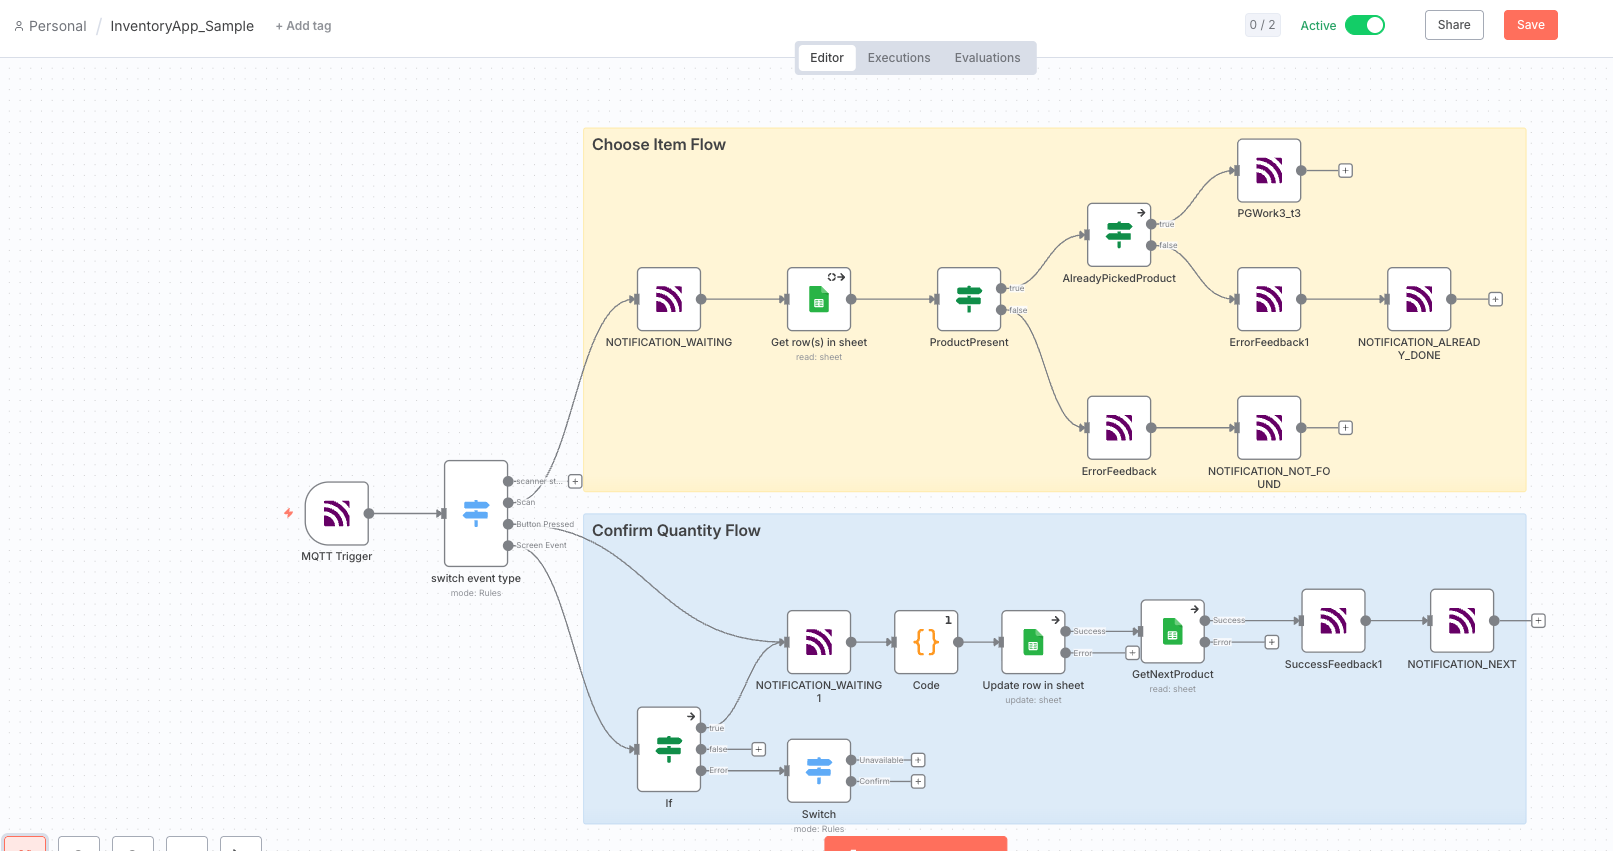
3. Choose Item Flow
This flow starts when a worker scans a barcode.
- The MQTT Trigger receives an event with
event_type = scan. - The switch node routes it to the Choose Item logic.
- n8n queries the Google Sheet for a matching product ID.
- Based on the result, we send one of several responses back to the MAI (via MQTT):
- Product found: display a Work3 T3 template - a structured layout optimized for short on-wrist reading. It contains fields for Product, Location, and Quantity, with input enabled on the quantity field.
- Already picked: issue an
ErrorFeedback(sound, LED, vibration) followed by aNOTIFICATION_ALREADY_DONEmessage using the T1 Notification template. - Not found: show a warning
NOTIFICATION_NOT_FOUNDmessage with the WARNING icon, also via the T1 Notification template.
This ensures the user always gets clear, immediate feedback aligned with ProGlove’s UX guidelines: short, positive messages for success, and visual icons for status clarity.
Example of a display command in the workflow:
"event_type": "display_v2!",
"active_screen_view": "INVENTORY_ROW_",
"screen_views": [{
  "pg_work3_t3": {
    "field_top": { "text_header": "Product", "text_content": "" },
    "field_bottom_right": { "text_header": "Location", "text_content": "" },
    "field_bottom_left": {
      "text_header": "Quantity",
      "text_content": "",
      "input_method": { "num_wheel": { "title": "Enter QTY" } }
    }
  }
}]
We use pg_work3_t3 because it provides three clear data points (product, location, quantity) with space for numeric input - ideal for the confirmation task. To identify which process we are in, we set the reference id (ref id) to the row id of the selected product.
4. Confirm Quantity Flow
When the user enters or confirms a quantity on the MAI, a new MQTT event is sent - either a screen_event (for field input) or button_pressed (for user confirmation). The workflow uses this event to update the corresponding row in the Google Sheet.
- The MQTT Trigger receives the event, which includes a
screen_context.ref_ididentifying which screen (and therefore which inventory row) the user interacted with. We use thisref_idto determine which product entry in the sheet to update:const screen_ref_id = $('MQTT Trigger').first().json.message.screen_context.ref_id const row_number = screen_ref_id.replace("INVENTORY_ROW_", "") return_values['row_number'] = row_numberThis mapping makes the flow stateful - no external session storage is needed. The
ref_iddirectly encodes which inventory line the user is confirming. - The Code node extracts the confirmed quantity from the message payload:
var confirmed_qty = $input.first().json.message.screen_context.screen_views_contexts[0].workflow.fields_contexts[1].text.contentIf the “Unavailable” button is pressed, quantity is set to
0. - The Google Sheets node then updates the corresponding row using the
row_numberas a key:"columns": { "row_number": "=", "Quantity_Present": "=", "Date": "=" }, "matchingColumns": ["row_number"] - Once the update is complete, the workflow provides positive feedback via MQTT:
"feedback_action_id": "FEEDBACK_POSITIVE"followed by a
NOTIFICATION_NEXTmessage to guide the user to the next location:"pg_ntf_t1": { "message": "Proceed to ", "tagline": "Article Updated", "icon": "SUCCESS" }
We use the pg_ntf_t1 template here to show a concise, single-action screen - consistent with ProGlove’s UX guidelines for transient, success-oriented states.
This approach ensures the right row is always updated, even in multi-device or concurrent use scenarios - the MAI’s ref_id acts as a precise, lightweight state reference.
5. Wrapping Up
With this workflow, we’ve built a simple yet powerful prototype:
- Full two-way interaction between MAI and backend logic via MQTT.
- Real-time updates in a shared Google Sheet.
- A guided user flow that adheres to ProGlove’s UX standards.
You can also download the n8n flow to get started.