Scan & Automate: Connecting ProGlove MAI to n8n and Responding (Part 1)
Introduction
At ProGlove, we build solutions that connect human workers to digital workflows in the most natural way possible. With our new Worker Companion MAI, we’re taking that a step further. And today, we’ll learn how to easily integrate the MAI via MQTT.
In this post (Part 1 of a short series), we’ll show how to use the MQTT integration of Insight Mobile to connect the MAI to HiveMQ, and send an automatic response back to the device. This simple setup already creates a powerful feedback loop for scanned items, and sets the stage for more advanced workflows we’ll build in Part 2.
What We’re Building
We’ll build a minimal workflow that looks like this:
📦 Scan item with MAI →
📲 Insight Mobile publishes via MQTT →
☁️ HiveMQ handles broker layer →
⚙️ n8n receives the message →
📩 Response is sent back to MAI
This setup allows you to confirm every scan with a real-time message to the worker — no backend code required. And then we can build some logic on top of this in the next article.
What You’ll Need
- A ProGlove MAI device with Insight Mobile installed and linked
- Access to the ProGlove Insight Platform with MQTT integration enabled. This is a special feature, so please contact your ProGlove representative for access.
- Any MQTT broker - we’ll use a free HiveMQ broker
- An n8n instance (hosted or self-hosted)
Step 1: Set Up HiveMQ
Start by setting up your MQTT broker. You can use HiveMQ Cloud to spin up a free instance.
- Login with HiveMQ
- Create a new serverless cluster and note your:
- URL
- On the Access Management tab, create 2 credentials (username & password) with “Publish and Subscribe” permissions.
- One for INSIGHT Mobile to connect. Create and note the username (maybe
insight) and password. - One for n8n to connect to the broker. Again, create and note the username maybe (
n8n) and password
- One for INSIGHT Mobile to connect. Create and note the username (maybe
- Use the Webclient on your cluster to test the traffic. You can click the “connect with autogenerated credentials” to log in and then subscribe to the
#topic (everything).
Step 2: Enable MQTT in Insight Dashboard
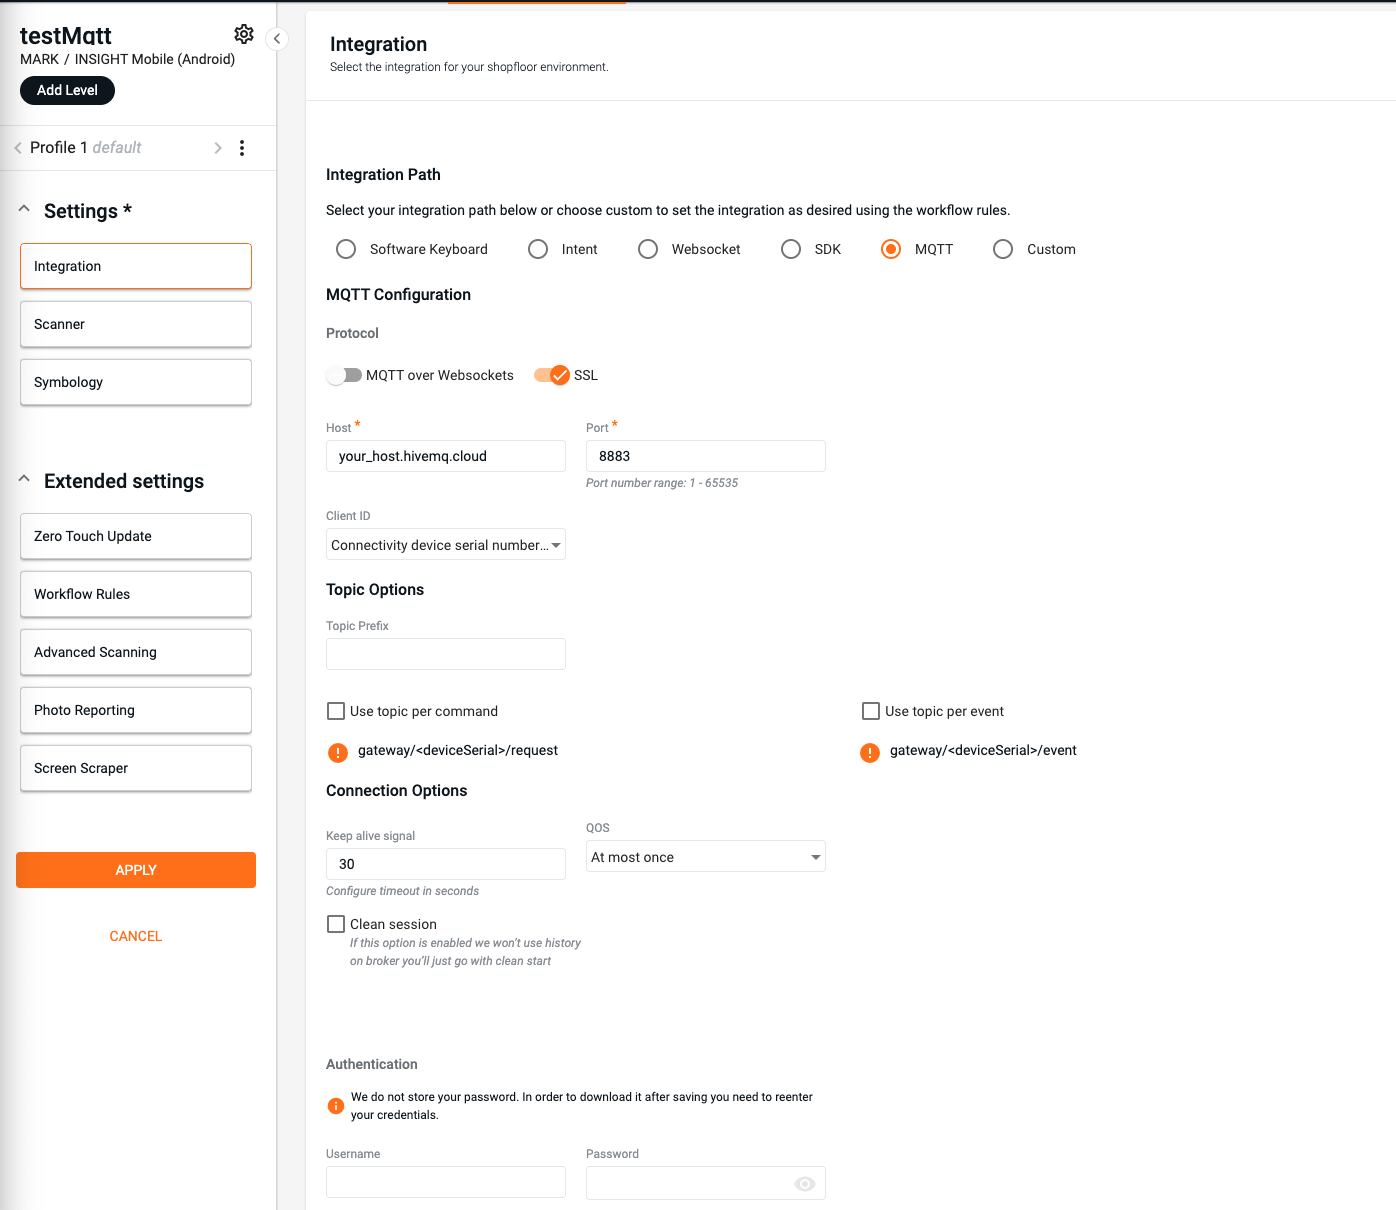
- Log into your ProGlove Insight account.
- Head over to the configuration section in Insight and create a new device configuration. Set the integration path to MQTT, then fill in your HiveMQ broker details:
NOTE: MQTT Integration is not available on all INSIGHT Plans - please contact your ProGlove representative to get access to it
- Host:
your-broker.hivemq.cloud- your HiveMQ URL from Step 1 - Port:
8883for secure communication - Username/password as you defined in Step 1 for HiveMQ.
- Host:
- Keep the topic options as default - “Use topic per command”/”Use topic per event” both unchecked. The topics should be:
gateway/<device_serial>/eventandgateway/<device_serial>/request.
Step 3: Connect Insight Mobile
- Install and open Insight Mobile on your Android device.
- Link it to your ProGlove MAI scanner.
- Scan the MQTT config generated on Insight with your MAI.
Scan an item, and you should see messages appear in your MQTT topic via HiveMQ’s Web Client or an MQTT Explorer.
Step 4: Build a Simple n8n Workflow
We’ll create a minimal workflow in n8n that listens for scans and responds with a confirmation message. You can also download the template for this workflow below.
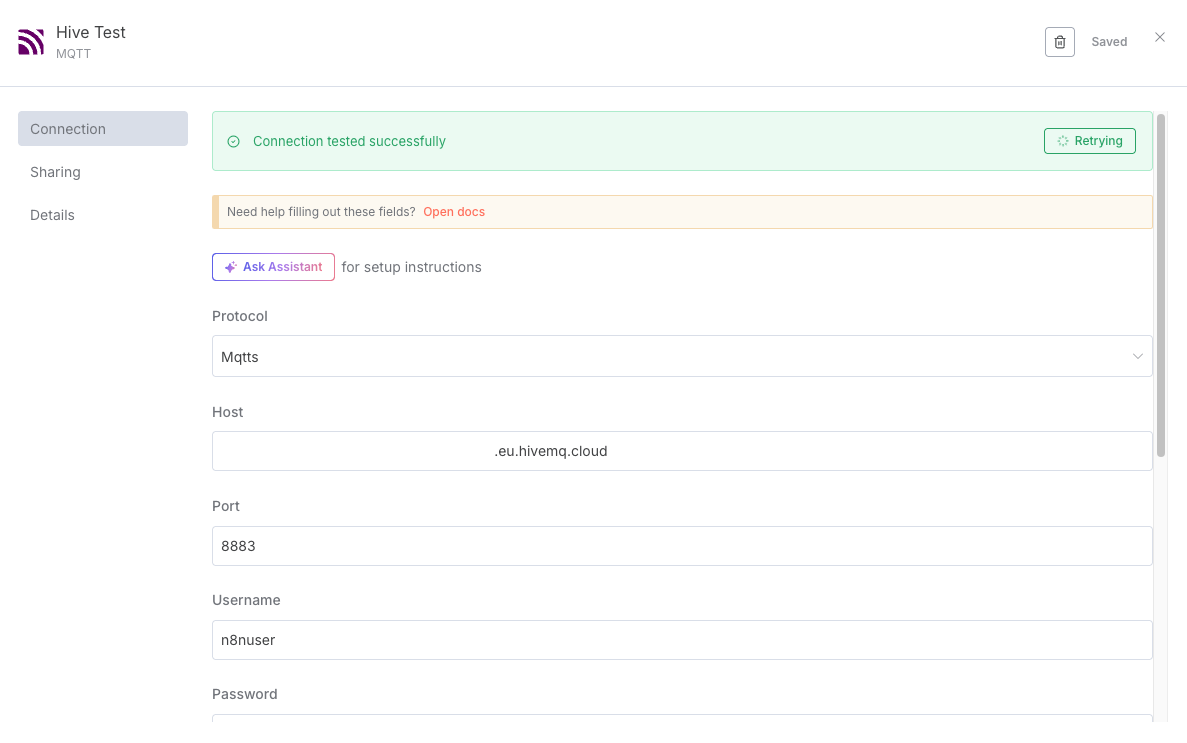
A. Define MQTT Credentials
- In n8n, create a new credential and select MQTT.
- On the detail dialog:
- Choose Protocol MQTTS
- Add your broker URL as the “host” - the same as on the INSIGHT Device Configuration
- set port to 8883
- Add the username and password as set in step 1 (the n8n user)
- set the “clean session” flag
B. MQTT Trigger
- Create a new workflow
- Add an MQTT Trigger node (with the ‘+’ on the right)
- Connect it to your HiveMQ broker.
- Subscribe to the topic
gateway/+/eventas defined in your Insight MQTT configuration. - add the option “JSON Parse Body”
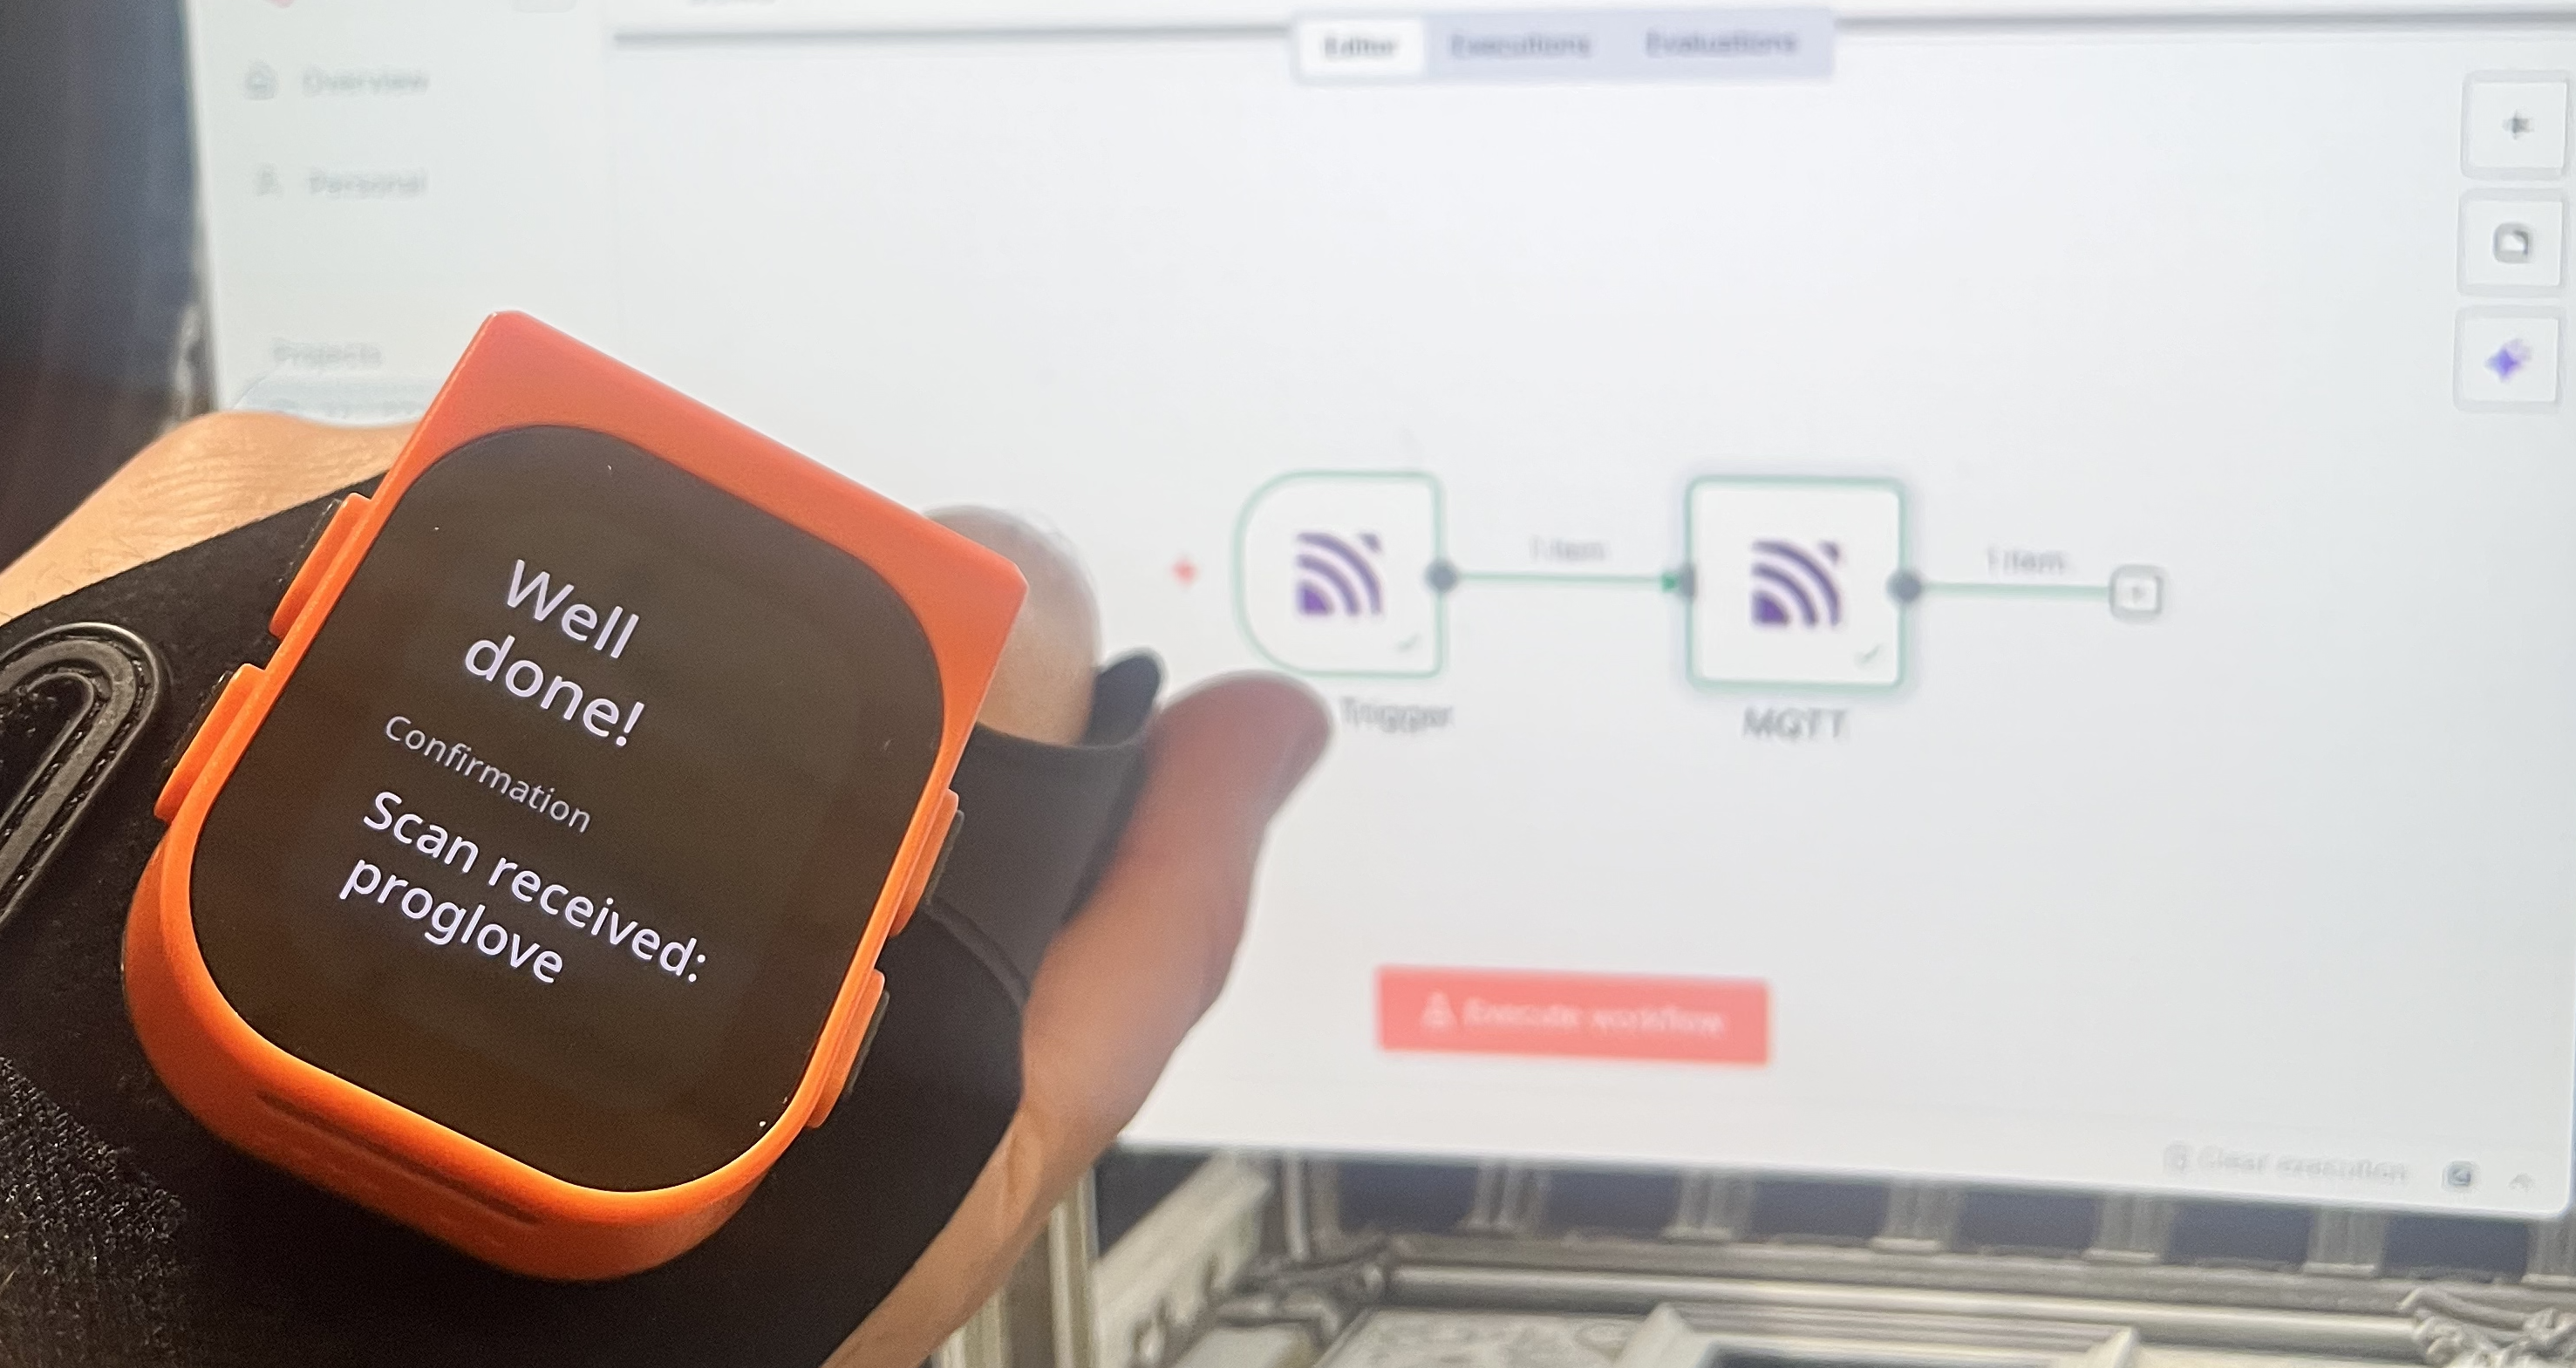
To try it out, select “Execute step” and scan a barcode. You should see the parsed message - this will also help as a template for the next step(s).
C. MQTT Response Node
- Add an MQTT node.
- Send a message back to the topic
gateway/{gateway_serial}/request. You can drag and drop thegateway_serialvalue into the topic field and then add the fixed text. It should look likegateway//requestin the end. - Format your message as a valid
display_v2!event according to the Streams API.
Use an expression to dynamically insert the scan code and device metadata into a full screen definition. Example message:
{
  "api_version": "3.0",
  "event_type": "display_v2!",
  "ref_id": "step1",
  "event_id": "165a797d-07f0-40ca-95d2-9aa070a777ad",
  "device_serial": "",
  "time_created": 1546300800000,
  "active_screen_view": "SCREEN_1",
  "screen_views": [
    {
      "pg_work2_t1": {
        "field_top": {
          "text_content": "Well done!"
        },
        "field_bottom": {
          "text_content": "Scan received: ",
          "text_header": "Confirmation"
        }
      },
      "ref_id": "SCREEN_1"
    }
  ]
}
This message will appear directly on the MAI device (via Insight Mobile), confirming the scan to the worker with proper formatting per the Insight Streams API. You can play around with different screens from our template library.
To try it out, hit the “execute workflow” button. If you want to keep it running, flip the “Inactive” switch at the top to make the flow running continuous.
n8n Workflow Template
To speed things up, you can download and import a pre-built n8n workflow that does exactly what we’ve described here:
This template includes:
- An MQTT Trigger node listening to the
gateway/+/eventtopic - An MQTT Publish node formatted according to the
display_v2!schema
Simply adjust your HiveMQ credentials and topic values as needed to match your setup.
Demo Scenario: Confirming a Scan
Let’s say a warehouse worker scans a barcode labeled GLV-XL-50.
- The MAI sends
scanData: "GLV-XL-50"via MQTT. - HiveMQ relays the message to n8n.
- n8n publishes a message back:
“Scan received: GLV-XL-50”
This feedback appears on the MAI device in real time.
What’s Next?
In Part 2, we’ll expand this workflow with:
- AI-powered interpretation of scan data
- Dynamic logic (add/update items)
- Integration with Google Sheets or other systems
- Full inventory tracking use case
Conclusion
With just a few tools — MAI, Insight Mobile, HiveMQ, and n8n — you can create a fully functional, real-time scan confirmation system. It’s simple, fast, and a great entry point into building intelligent workflows around your ProGlove devices.
Stay tuned for Part 2!