Hacking our products: ProGlove MARK as a presentation clicker
Let’s use our own products in a way they are not intended for. As you may (or may not) know, ProGlove designs & manufactures smart wearable barcode scanners - also known as MARK. Today, we’re going to use one of these devices as a presenter or clicker.
Walk on stage, zap a barcode (with lasers!) and start presenting!
Basics
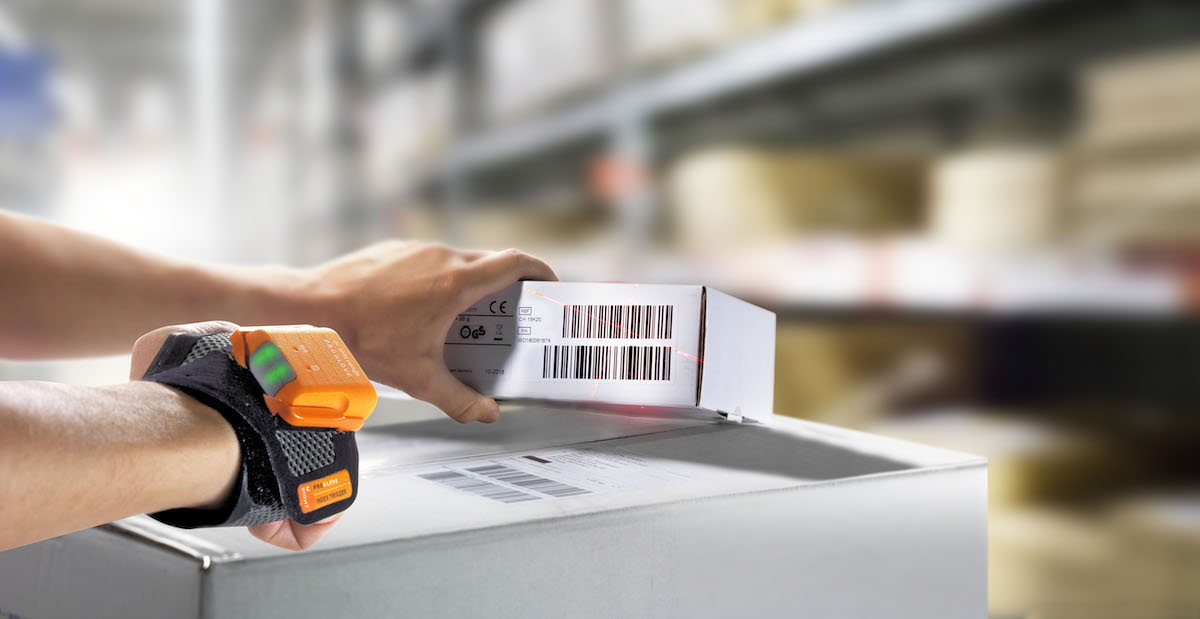
A barcode scanner takes a printed/displayed visual code (1D or 2D barcodes) and transfers its content to a computer. Even in 2022, the most basic (and therefore versatile) way to transfer the codes is by typing them in. While our MARK scanners can support all kinds of fancy 2-way protocols (from Websockets and MQTT to Android Intents), “keyboard integration” is still a standard method of operation for many of our customers. The scanner acts as a keyboard, typing the barcode content “into” the computer.
ProGlove scanners are usually connected to a connectivity device for deep integrations. Very common is our Gateway device (which will also act as a Keyboard by default) or our Android app Insight Mobile. However, for certain use cases, MARK can also be connected directly to a computer or phone as a Bluetooth keyboard. We refer to this as Bluetooth (or BLE) HID.
Hacking
As it turns out, we can use THAT keyboard to make MARK act as a presenter. Like this: 
… just on the back of your hand shooting lasers.
You can use the Gateway device to do this, but if you’re on stage you want as little complexity as possible. This way you’re directly connected to your computer via BLE HID, controlling the presentation in Powerpoint.
To get this started, you need to do three things:
1. Connect to BLE HID
As outlined in our documentation, you need to scan the
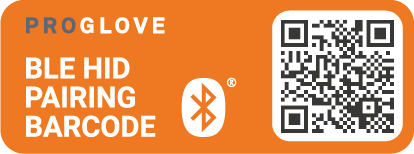
pairing barcode with MARK to start the BLE HID Pairing mode. Then, open up your system settings for Bluetooth and add MARK as a Keyboard. You can more find more detailed instructions for this in our user manual.
2. MARK configuration
Now, you need to configure MARK to not send “Enter” after each character because that would confuse Powerpoint. Also, it’s probably a good idea to turn on the silent mode for MARK, as well as to set up easier scanning from a display. Normally, you would configure MARK via the connectivity device and our insight platform. But because we’re hacking today, you can use our legacy tooling - config.proglove.com. I’ve gone ahead and created a config for this purpose:
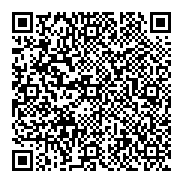
Scan this config with your ProGlove Scanner.
3. Generate the Barcodes
If you’re playing with Powerpoint (and most other presentation tools), you’ll see the following keys to navigate between slides:
EnterorLeft Arrowmove to the next slideBackspaceorRight Arrowmove to the previous slidebblacks out the screen
We can create barcodes for this easily. Enter and backspace are probably the easier option than the left and right arrows, so let’s go with those. We like to use the barcode generator from tec-it, so to create QR-Codes:
| Key | QR-Code |
|---|---|
| Enter |  |
| Backspace |  |
| b |  |
Print these out and put them somewhere on the stage to start to scan them/use them during your presentation.
Putting it all together
With the printed out barcodes, your slides in presentation mode and a connected (and configured) MARK, you’re good to go. To advance one slide/step, zap the “Enter” barcode, to go back one slide the “Backspace” barcode and to blank out the screen the “b” barcode. And because our MARKS are really good at barcode scanning, putting the barcodes on the floor in front of your feet or next to the PC is no issue at all.
To make your life even easier, we’ve combined these instructions into two pages to print out. One for the preparation, one with the “navigation” barcodes to put somewhere around your presentation area.
Teardown
One of the main reasons we don’t like the HID connection is that it’s “hardcoded” - once you have MARK connected to your computer, it will always reconnect to this computer. Hence, don’t forget to remove the MARK again from your system Bluetooth settings after you’re done with this presentation - otherwise, no connection to the Gateway or Insight Mobile would be possible.